Showing posts with label DIY. Show all posts

Monday, 19 December 2016

Dorset Etsy Team Christmas Fair


I was going to write this post a few weeks ago but life got in the way! Decembers always super hectic for me and even with the best intentions I have been shocking at getting shit done! I am so behind its unreal! So I had a little debate with myself as to whether it was too late to write about this but to hell with it, I had a great day at this and wanted to share it with you all!

What am I waffling on about this time? Well let me tell you... As you may or may not be aware, I have my own Etsy Shop and a few weeks ago I attend the Dorset Etsy teams Christmas fair which was held in Wimborne and supported by Etsy Made Local. I had a stand for my shop Pearl Divine and had a blast. It was the first Dorset Team event I have attended and I was blown away by how friendly and lovely the other team members/stall holders were.

I was a bit nervous to begin with as wasn’t sure what to expect but I had such a great day and cant wait to sign up for next years event already! The event as a whole was a huge success with 70 stalls and with over 2000 people through the doors! The quality of produce available was immense and I feel really proud to be part of the team. There was so many talented stall holders and you can check out the full list of them here. I Would definitely recommend having a browse!

P.S as a bit of a thank you and as I’m super feeling in the holiday spirit I’m offering 20% off EVERYTHING in my Pearl Divine shop until the 31st January 2017. Just use the code ‘ THANKYOU20 ‘ at the checkout! Go on you know you want to treat yourself....


Sunday, 18 December 2016

Getting into the Christmas Spirit!


The one week countdown to Christmas begins!! Wahoo!! Love this time of year and I’m especially looking forward to the next week as I have lots of Christmas catch ups coming up! So this past week just gone I’ve been really trying to get in the Christmas spirit, so I thought id share with you what I’ve been doing to get in the Christmas mood...

First up, one of my awesome friends is an amazing artist and crafter and put on a wreath making class. It was two hours full of moth, holly and mulled wine. A ridiculously fun evening! I’ve never made a home made wreath before and am so happy with what I ended up with.


Every year I get Xmas themed nails and I love them! I usually go for bright and tacky but this year I wanted something a big more classy so went for black nails with white nail art and its perfect. Its understated and has a vintage feel.

I have a bit of a tradition lf making home made Gin which I then hand out as a present to various people This year I went for strawberry flavoured Gin and I’m really pleased with the results, it  is yummy! After a few months of brewing and agitating it, this week I was time to decent not bottles ready to hand out for Christmas.


We also finally put up our Christmas tree!! I went for a gold theme and It looks great, even if I do say so myself. I just had to share this photo, how cute do my puppies look framing the tree!!


Wednesday, 26 October 2016

Pretty in Pink // Bedside table upcycle


I love checking out upcycling projects on Pinterest and various blogs and I love a good crafting session, however I’ve never been brave enough to take on a piece of furniture and upcycle it myself. This is, until now!

My poor bedside table was purchased from B&Q about 8 years ago and has followed me round many numerous accommodations’ and as you can imagine was looking a little battered! The white paint on the top surface was peeling off and compared to my other pieces of furniture (its a giant mish mash of various pieces) it didn’t really fit anymore. So I decided to challenge myself and see what I could create, I figured it couldn’t look any worse than it already!

I’ve got a thing about the colour pink at the moment, after many years of being a tom boy I am finally embarrassing the colour and I love it! I’ve unconsciously been gaining more and more pink things for my bedroom and it now got a pink and grey theme happening. So I decided to fully embrace that and incorporate it into my cabinet. I therefore chose to go for a baby pink base with a marbled top.

To get the look, I decided spray paint would be a lot easier than actual paint, which I think is true but you may get a nicer Finnish with paint? Unsure on that one! I was patient, very unlike me I know and used a spray paint primer as a base. I did a couple of coats of this to make sure it was even. Once the primer was dry I then used the pink spray paint, and did three coats over all. I think finished it with a clear gloss top coat.

For the top I found some marble print laminate sticky paper in B&Q. I absolutely love this stuff and think it looks fab! It was quite easy to apply, you just need to make sure you squish all the air bubbles out!

I love the final look so much! On pay day my plan is to treat myself to a industrial style pink table lamp to Finnish off the look! What do you all think? Are you an upcycler?

Friday, 29 May 2015

DIY: Wooden Initial Letter

I haven’t done a DIY post in so long! Which is silly as I have been making lots of bits of pieces lately that would be fun to share with you all! My issue has been lack of a lap top, but I have been lent a lap top so I can finally share this pretty wooden letter DIY! Yey! It’s such an easy one and so fun to make! This specific letter was sent as part of my ‘Spring’ themed #DICraftSwap. If you’ve not heard of this swap then you need to check it out, it’s run by Hannah over at Dainty and Ivory and is such a fun idea, each month she pairs you up with someone to make and send some goodies too and each month has a different theme. So as you may have gathered I had Hannah to send to for the spring themed swap, hence the letter H!


What you need:
Wooden letter
White gloss paint
Paint brush
Hot glue gun
Fabric Flower

What to do:
You can find wooden letters in most craft shops now, I actually found mine in a garden centre! So first step is to paint your wooden letter, I used a white gloss paint which I had lying around at home. I wanted a glossy bright finish so this worked perfectly for me. To get good coverage I ended up doing quite a few coats of paint. 

Once the paint was dry I then chose the type of flower I wanted to decorate my letter with. I have quite a few fake flowers at home as I use them to make the floral crowns I sell, but you can pick these up pretty cheap in shops like wilkos or somewhere similar. I then cut the flower head off of the stem and using a hit glue gun, I put a blob of glue on the area I wanted to stick the flower on. I then held the flower in place until it felt like it was sturdy. I then left it to dry! 

I’ve made these letters for a few friends now, they are really easy to do yet so effective! What do you think?


Wednesday, 27 May 2015

What I'm Loving Lately #2


1.       I’m in a post bank holiday lull! I love having two bank holidays in May and I’m not sure I can cope lasting till August for the next one! I think 3 day weekends should be mandatory! Anyways I couldn’t post a ‘what I’m loving lately’ post without mention last weekend’s bank holiday. Mine included a 15 mile bike ride in the sunshine and a few pints of cider by the beach! T’was perfect!

2.       My latest #DICraftSwap parcel arrived from the lovely Hannah, the theme was Love and she sent me an amazing handmade unicorn and a handmade candle. Was such an awesome parcel to receive! Hannah is also the wonderful lady who organised this monthly craft swap, check out her blog here.

3.       So last week I had an awful cold which meant I literally did nothing except for work and come home and snuggle under my duvet, with long sessions of guilt free Netflix viewing! There’s got to be some perk to being so poorly. I was umming and aaahing over what to watch next after finishing Pretty Little Liars, so I decided to go for what had been recommended and have been binge watching Sons of Anarchy. I LOVE IT!!! How have I left it so long before I started to watch it?! Its sooo good! I’m on series 3 already and think I’m bordering on an unhealthy viewing addiction with it!

4.       TREK Protein Flapjacks – I was lucky enough to be sent a box of these from Natural Balance Foods in various flavours and boy are they yummy! I’ve been eating one an hour before I go for a run or do an exercise class for a bit of an energy boost. I am slightly obsessed with the Cocoa Coconut flavour, it’s a bit like rice Krispies on the base with a layer of chocolate on top, and they are very moreish!

5.       I AM GOING TO SEE THE FOO FIGHTERS TODAY!!! Yes I am that excited I have to shout/capitalise it! I am literally going to click ‘post’ on this piece and then head out to my car to embark on an epic drive up to Manchester, which is 5 hours from my door! Eeek! They are my most favourite band ever and I have always wanted to see them live, my friend’s friend was unable to go and offered us the tickets! It’s going to be a long drive but so worth it! I am literally bouncing on my chair as I type this!

6.       Two weeks ago I tried wakeboarding for the first time and had the best time! I am a complete water baby and any sport or activity involving having fun on the water, count me in! So myself and a friend headed to the New Forest for the day to try it out, we were on a wire and not a boat and had a lesson.  I managed to stand up really well on the board and I am definitely going to be going again this summer! They do ladies mornings so I think I'm going to give them ago!

Thursday, 12 February 2015

DIY: Valentines Jam Jar Tea Light Holders

Have you heard of the Jam J-Art Campaign yet? The idea behind the campaign is to get people to be more creative and recycle jam jars, you can find out more on their website which is here.  The folks behind Jam J-Art recently sent me 2 jars to play with and I decided to focus on a valentines theme and make some cute tea light holders. 


Here is how to make your own...

What you’ll need...


Jam Jar
Small hearts cut out of tissue paper
Mod podge
Paint brush

How to do it:

Make sure the jam jars are super clean and ready to go. Cut small heart shapes out of tissue paper. I used a variety of colours as I wanted mine to be bright and fun but I think if you went for just one colour that would look fab too!

Next paint the mod podge onto the jar in the place you want to stick a heart. On one of my jars I just went for a central line of hearts around the middle of it and the second one I added more hearts in a more random pattern. Paint over the heart with the mod podge once you have placed it to seal it into position.

Let it dry for around 12 hours and then place your tea light into the jar and light it!


I am so in love with my cute jars! I think they look really fun and they are so simple to make. What do you think of them? 

Sunday, 4 January 2015

Christmas #DICraftSwap

Over the past year I’ve really fallen in love with crafting, and just generally being creative again. I don’t think I ever really feel out of love with it, I think life just got in the way and I didn’t really make time for it. That’s all changed lately and I am so glad to be back making things and having fun with craft. So when I found out about Hannah's #DICraftSwap I just couldn’t resist signing up!

This is the second swap I’ve signed up for and I’ve really enjoyed doing them! Each month she announces a new theme for the swap and then Hannah emails you the person you are sending to, the person you are sending to is not the person you are receiving from. It’s up to you if you want to reveal yourself. Each parcel must include at least one handmade item and one bought gift with the min. value of £3. Spending and making more is entirely up to you!

This rounds theme was ‘Christmas’ and I was given Lauren who blogs at ‘Oh Hay!’ to make something for. I decided to make her some star tree decorations and a necklace, I had so much fun making these pieces. I also sent her a Doctor Who print as she is also a fan. I did take some pics of everything I sent but somehow managed to delete half my photos this morning and have been unable to retrieve them! So all I can show you are the stars I made for Lauren....


The lovely Claire who blogs over at ‘The Owl in the Teacup’, had me and she completely spoiled me! She made me 2 absolutely gorgeous traditional Swedish Dala Horses, which have had pride of place on my tree this year. Claire also made me a twine and painted heart picture holder, which I am going to use to hold photos as it looks fab!


Claire also treated me to the cutest pair of unicorn socks, some unicorn stickers and a lovely letter set which I have already started using. Oooh and a Thornton’s fudge chocolate bar which didn’t last long at all!

Massive thank you to Claire for such lovely treats and to Hannah for organising this! If you are interested in craft swaps then I really recommend popping over to Dainty and Ivory to sign up. I’m skipping the current swap due to lack of funds and time but look forward to joining in with more this year! 

Saturday, 13 December 2014

DIY: Star Tree Decorations


I love homemade Christmas decorations, they just add such a lovely personal touch to proceedings. I recently spotted on Pinterest these really lovely tree decorations made from twigs. The only issue is having time to dry twigs out! Especially in this miserable wet UK weather! This kind of put a downer on these decorations until I thought I would have a go at making them using brown gardening wire which looks a little twig like! I am so pleased with the final result and thought I’d share a DIY post with you all on how to make these twiggy star decorations!

Brown gardening wire
Thin coloured paper, ribbon or thread of your colour choice.
Scissors
Wire cutters
To make…

1.       Using the wire cutters cut 6 equal length pieces of the gardening wire. I went for 2 inches each but you can alter this depending on how big or small you want your star.
2.       Choose two colours of ribbon, string or thread of your choosing. You are looking to create two triangles, so take 3 pieces of the wire and tie each corner together using your chosen string. Do the same again to create a second triangle.
3.       Place the triangles on top of each other to create a star shape.
4.       Then wrap your string/ribbon/thread around the centre of your star to secure the wire together. I used red string and gold thread to get the look I wanted, but you can use whatever colours you want!
5.       To finish tie a look of string to one of the points of the star and then hang on your tree!
What do you think? Are you a fan of handmade decorations?

Thursday, 11 December 2014

#TBT Homemade Christmas Gift Tags!


Welcome #TBT / Throw Back Thursday! Where I am going to be delving into the depths of blog posts past and repost some of my favourites to share again with you all! I haven’t done one of these for ages so I thought a Christmas themed one was due!
Originally Posted // 3rd December 2013


As mentioned before in other DIY posts I am a huge fan of scouring pinterest for ideas and inspiration. Last Christmas I kept coming across these vintage stamped gift tags which are so simple but so effective. They’ve cropped up a few times on pinterest this year as well as on a few blogs I follow and I think they look fab! So I couldn’t resist giving it a go myself.
I found the vintage tags in my craft box at home and the alphabet stamps I came across on Ebay for £4.99, which includes ink. I thought this was pretty reasonable! When they arrived, I was so excited to give them a try, it’s now meant I have done all my Christmas labels already!
What do you think? Do you like to get creative at this time of year?

Wednesday, 10 December 2014

Woodland #DICraftSwap

Over the past year I’ve really fallen in love with crafting, and just generally being creative again. I don’t think I ever really feel out of love with it, I think life just got in the way and I didn’t really make time for it. That’s all changed lately and I am so glad to be back making things and having fun with craft. So when I found out about Hannahs #DICraftSwap I just couldn’t resist signing up!

Each month she announces a new theme for the swap and then Hannah emails you the person you are sending to, the person you are sending to is not the person you are receiving from. It’s up to you if you want to reveal yourself. Each parcel must include at least one handmade item and one bought gift with the min. value of £3. Spending and making more is entirely up to you.

October’s theme was woodland! I was pretty excited by this as thoughts of leaves, winter walks and woodland fairies started to fill my mind! I was given the lovely Louisa who blogs over at ‘Luthaisea’s Kit’ to create something for!

We are all asked a few questions on the theme and that is sent to whoever is making for you. In Louisa’s, she said her favourite woodland animal is a hedgehog so I decided to make her a hedgehog plushie door hanger. I am so happy with how the little guy turned out!


In the information I was sent about Louisa she said that when she thinks of woodland she thinks of Sunlight lancing through trees, now I love tea lights in jars and started playing with some colourful leaves I had in my craft box. Using some Mod Podge I stuck the leaves around the jar so when the tea light was lit inside the jar the light would shine through the leaves! I was pretty chuffed about my logic on this one and even happier with the result, if I am allowed to say that?!


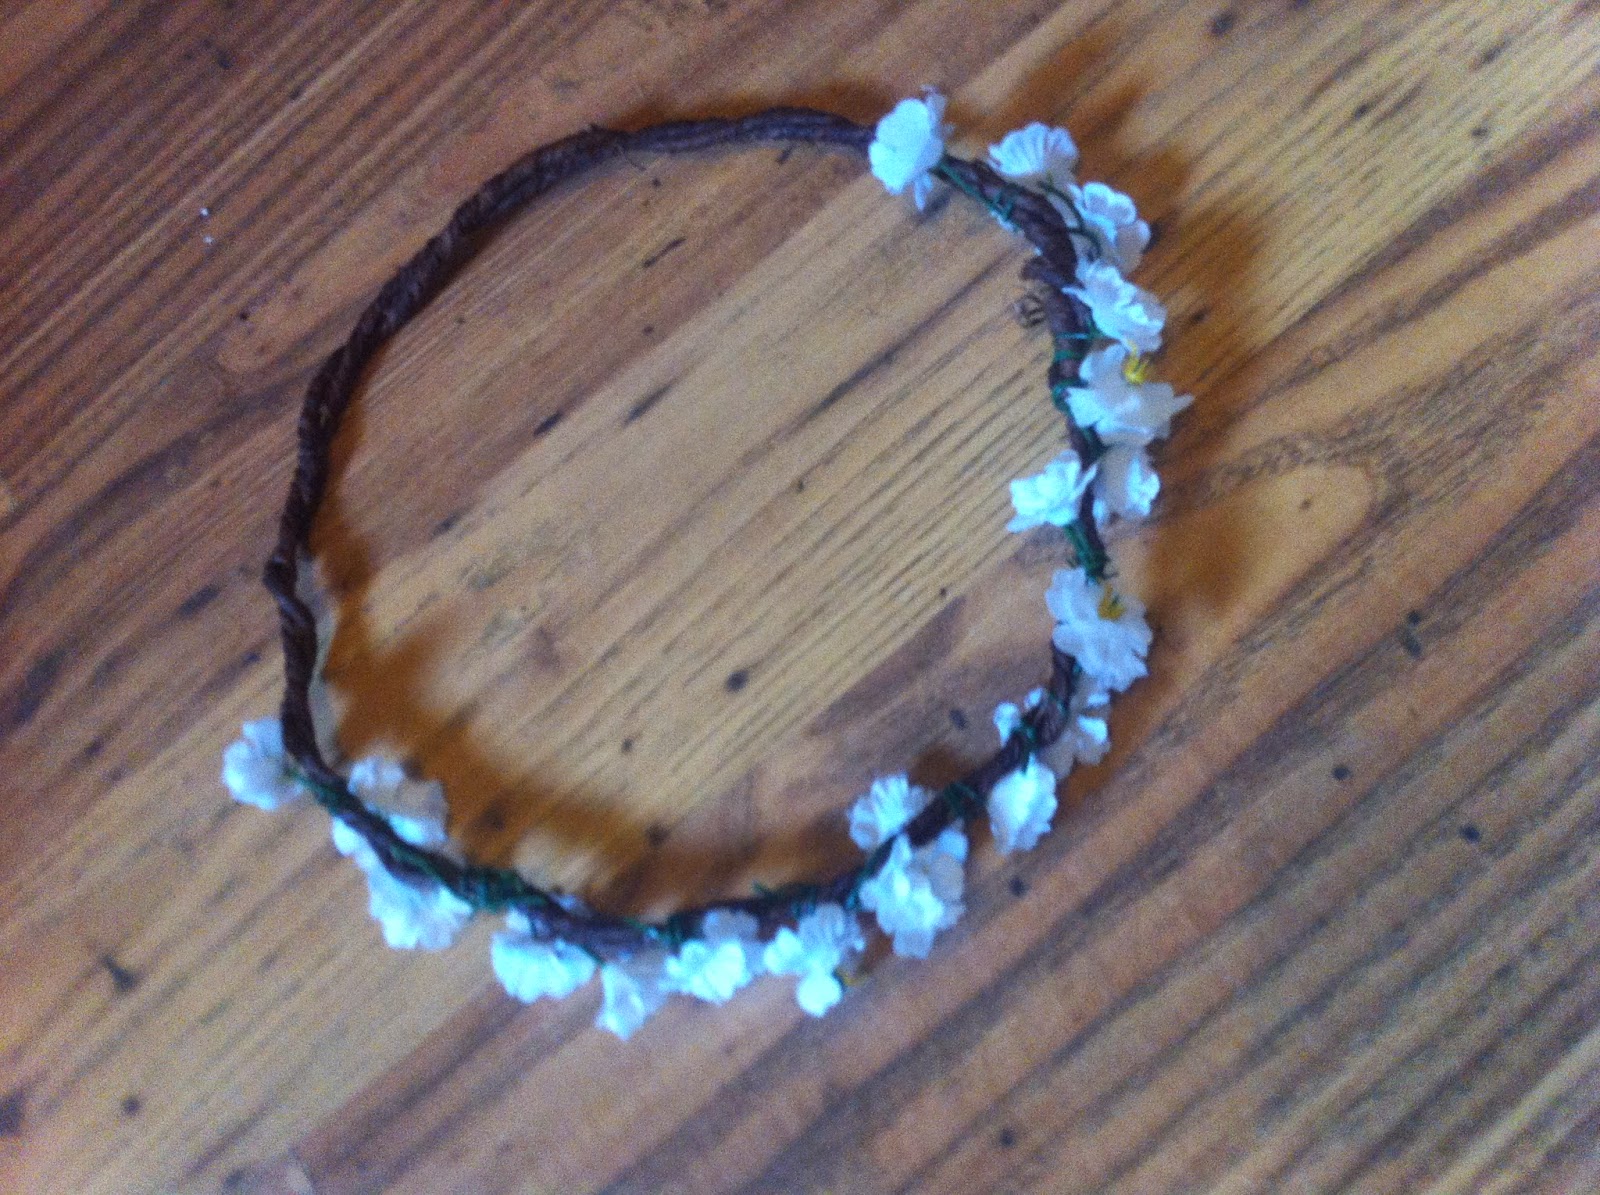
The final thing I made was a floral crown, woodland reminded me so much of fairytales, mystical creatures and magic. So I thought it would be fun to add this to my package! I make quite a few floral crowns which tend to be filled with huge bright flowers, I wasn’t sure if that would be Louisa’s style so decided to go for a dainty white flower instead. I wish I had a better picture to show you!

Louisa is also a huge fan of Scotland and all things Scottish so I added some tartan material and a thistle necklace which I placed a woodland printed tin. I had so much fun crafting all my pieces and getting my package ready! A few days after I sent off my parcel to Louisa I then received my own in the post!

The gorgeous Jenny who blogs over at Pretty Column had me and I felt thoroughly spoilt when I opened my package! Check out my new buddies...


Jenny had crocheted this fabulous fox and to accompany Mr Fox was this adorable hedgehog. They are both placed on a shelf above my desk looking very cute! I was also sent these great mushroom candles which I have placed above my fireplace. I am not sure I will light them as I like them too much!

Finally I also received this lovely woodland themed pencil case. My bag is ridiculous, I have about 27 pens floating around the bottom of it but can never find one when I need it! So I had great fun pulling them all out and popping them into my shiny new pencil case, I actually feel organised!


Massive thank you to Jenny for such lovely treats and to Hannah for organising this! If you are interested in craft swaps then I really recommend popping over to Dainty and Ivory to sign up. The theme for the next swap is Christmas!!

Tuesday, 15 April 2014

DIY: Neon Animal Key Ring

I have a handful of blogs I read religiously and one of these includes The Nectar Collective which is run by the lovely Melyssa.  When I spotted that she was running ‘The Creative Collective’ I just had to get involved. It’s a year-long community building, creative program that you can hop in and out of. Melyssa has thought of 23 fun activities for us to do, that are creative yet varied so there is something for everyone! I love the whole concept, over the last year I have been determined to try new things, be more creative and enjoy myself and this project fits in perfectly with that!
 
The current activity is entitled ‘When pinterest comes to life’, I have a sad addiction to pinterest and my DIY board is huge! I had to decide between a few bits and bobs as to what I was going to make, so here is what I decided on…. DIY Neon Animal Key ring! Here is the original link.
What you need:
Acrylic Paint
Small plastic toy animal
Key ring
Small screw hook
Paint brush
 
What to do:
I started by attaching my small screw hook to the key ring chain (I purchased a pack of these off of EBay). I then had to choose what animal I was going to do, I went for a giraffe! I then screwed the hook into the back of the giraffe, which took a bit of effort!
 
I then started applying my acrylic paint, I went for awesome neon pink! Overall it took three coats of paint to get the correct coverage. Then leave to dry, then voila! A really funky neon key ring!
 
What do you think of this? Would you purchase it? I’m thinking of starting an etsy shop to sell my jewelery and was debating whether to add these key rings to? Thoughts?

Tuesday, 3 December 2013

Homemade Christmas Gift Tags!


As mentioned before in other DIY posts I am a huge fan of scouring pinterest for ideas and inspiration. Last Christmas I kept coming across these vintage stamped gift tags which are so simple but so effective. They’ve cropped up a few times on pinterest this year as well as on a few blogs I follow and I think they look fab! So I couldn’t resist giving it a go myself.
I found the vintage tags in my craft box at home and the alphabet stamps I came across on Ebay for £4.99, which includes ink. I thought this was pretty reasonable! When they arrived, I was so excited to give them a try, it’s now meant I have done all my Christmas labels already!
What do you think? Do you like to get creative at this time of year?
Related Posts Plugin for WordPress, Blogger...